Step 1:
To begin, download and install the Xampp server as well as
WordPress. Please see the links below.
https://www.apachefriends.org/download.html
(XAMPP)
https://wordpress.org/download/#download-install
(Wordpress)
Step 2:
The Xampp server will be installed on your computer in the next step. To run the.exe file, click on it.
Step 3:
The second screen appears when you click on the next button, and it displays the components that need to be installed. In my situation, I want to install all of the components at the same time. Simply double-check all of the components before pressing the Next button.
Step 4:
After you click the next button, you will be sent to the next page. In the other window, you can see the installation folder that was created. Simply choose the location where you want to install xampp and press the Next button.
Step 5:
The fifth window is located on the right-hand side of the screen. You must be able to view the language selection window. There are two types of languages that are supported by Xampp. The first one is in English, while the second one is in German. In my situation, I choose English and then press the Next button on the keyboard.
Step 6:
In a different window. Simply display the information about XAMPP from Bitnami.
Step 7:
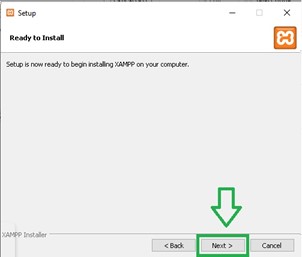
You should now see a popup that says "Ready for
installation." To proceed, use the Next button. After that, your
installation will be started.
Step 8:
Go to the WordPress folder in the same location as the
folder you downloaded from the URL I provided in the previous step. and then
unzip it
Following that, the WordPress folder will be unzipped.
Simply copy the folder and move it to the location where you installed XAMPP.
Navigate to the htdocs folder by selecting the XAMPP Folder
option. Additionally, copy and paste the WordPress folder. In my instance,
XAMPP is installed on the C disc.
C:\xampp\htdocs
Step 9:
Now go to the xampp-control directory. It can be found in
the xamapp folder. And then you open it.
Step 10:
Following the click of the xampp-control. It is necessary to
see the xampp control panel. After that, just click on the Apache configuration
icon and go to the (Apache(httpd.conf)) directory.
Step 11:
Step 12:
Now, start the Apache or MySQL server by pressing the start
button on your computer. And then open your browser and type localhost:8080
into the address bar. After you've entered the URL, the XAMPP dashboard will
appear.
Step 13:
The XAMPP dashboard is now visible in your browser. Go to
Phpmyadmin and create a database with whatever name you like; in my example, I
created a database with the name WP. Then click on the "Create"
button.
Step 14:
After your database has been properly established, open your browser and put the URL localhost:8080/wordpress into the address bar. If you click on the URL, you will be instantly sent to the WordPress installation window. Select your preferred language and press the Continue button.
Step 15:
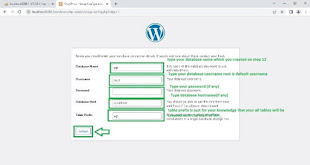
On this window, you'll enter the database credentials you created earlier.
Step 16:
The last window of your installation has now been identified. After you have completed all of the processes successfully.
Step 17:
It is now necessary to enter your WordPress login
credentials.
Fill up the blanks with your WordPress username, password, and email address.
Step 18:
Now all you have to do is click on the Log In button. And your WordPress installation has been completed on your computer.
I hope it's helpful for you. If you have any queries, don't hesitate to contact me.


0 comments:
Post a Comment
If you have any doubts, please let me know. I will help you.